Softaculous WordPress Manager
If you intend to use WordPress as your hosting platform with TSC, we strongly recommend you use and install via the Softaculous WordPress Manager.
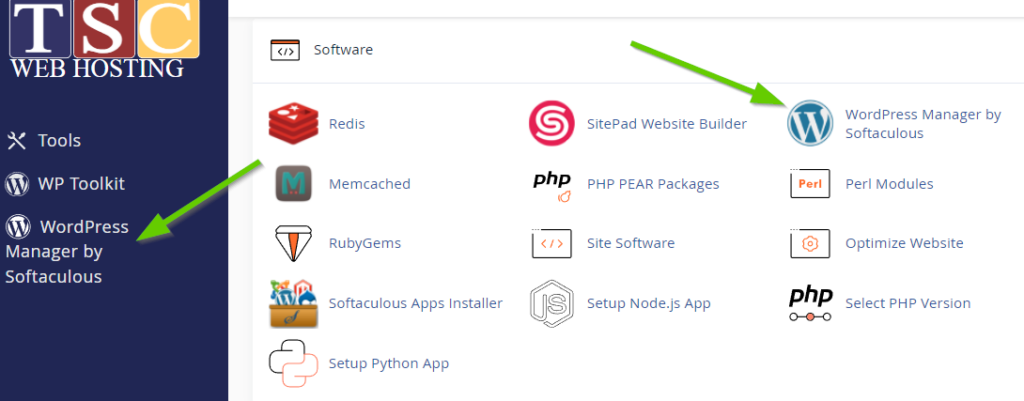
Softaculous WordPress Manager can be found in the left main menu of cPanel or under the Software category.
Once you have accessed the Softaculous WordPress Manager you now have the ability to install, update and modify your WordPress installation, including perhaps the most valuable tool… direct Admin access (even if you’ve forgotten your password).
Although the Softaculous WordPress Manager will allow you to handle most WordPress functions from the cPanel interface, you may still find performing them inside WordPress is best for troubleshooting and visual aspect; however, it does provide almost complete control.
Available Features
Auto Login to WordPress admin panel
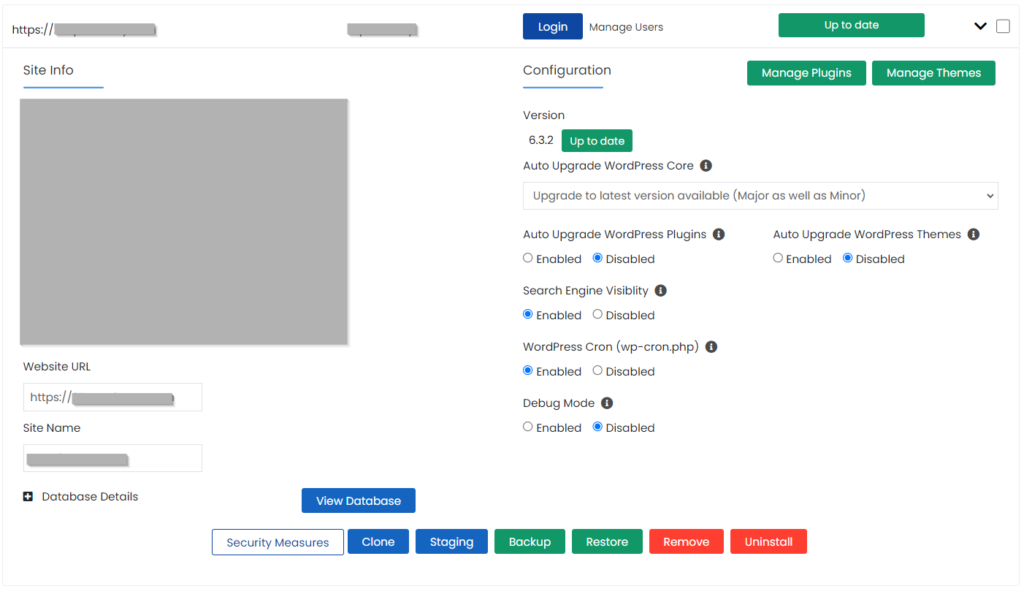
Click on the “Login” button next to your site url to automatically login to your WordPress panel as admin user without having to enter the password.
Upgrade Installation
If your installation has an update available you will see the “Upgrade Now” button next to the version number. Just hit that button and it will take you to the upgrade page.
Auto Upgrade Core Settings
Choose your auto upgrade settings for WordPress core. You can choose from the following options and Softaculous will perform the updates accordingly:
- Do not Auto Upgrade
- Upgrade to Minor versions only (i.e. 5.5.1 will be upgraded to 5.5.x and not 5.6.x)
- Upgrade to latest version available Major as well as Minor (i.e. 5.5.1 will be upgraded to 5.5.x until there is a new major version available and 5.6.x when available)
Just choose your preference and it will be automatically saved and you will see a success message.
Auto Upgrade Plugins/Themes Settings
Choose to enable/disable Auto Upgrade for Plugins or Themes. If you enable Auto Upgrade plugins or themes, updates will be checked once every 24 hours and will be upgraded. Just tap on Enable/Disable button and it will save the preference and you will see the success message.
Enable/Disable Search Engine Visibility
The Search Engine Visibility setting in WordPress Reading options can also be customized. If you are cloning your live site to a dev site or your website is still not complete and you do not want Search Engines to index your site you can set this setting as disabled. If you want Search Engines to index your site you can enable this setting. Just tap on Enable/Disable button and it will save the preference and you will see the success message.
Enable/Disable WordPress CRON
By default WordPress has a CRON job enabled which performs various tasks on your site. Sometimes with huge sites this can consume your server resources. If you would like to enable/disable this wp-cron setting you can tap on Enable/Disable button and it will save the preference and you will see the success message.


